How To Install A Window In A Door!
We are in the process of remodeling our laundry room and we’re in desperate need of a new door in there, so I replaced it with a new one. The old one had a window and I wanted this one to too, so I teamed up with my friends at Zabitat to show you how to install a window into an exterior door!
At first I thought this was going to be a challenging project, but I quickly realized that this was going to be a super fun and satisfying project that you can complete with just a couple of tools… a drill and a jigsaw!
This post IS sponsored by Zabitat. All opinions are my own. This post DOES contain affiliate links. For more information on my affiliate programs see my DISCLOSURES page.

BEFORE
Step 1:
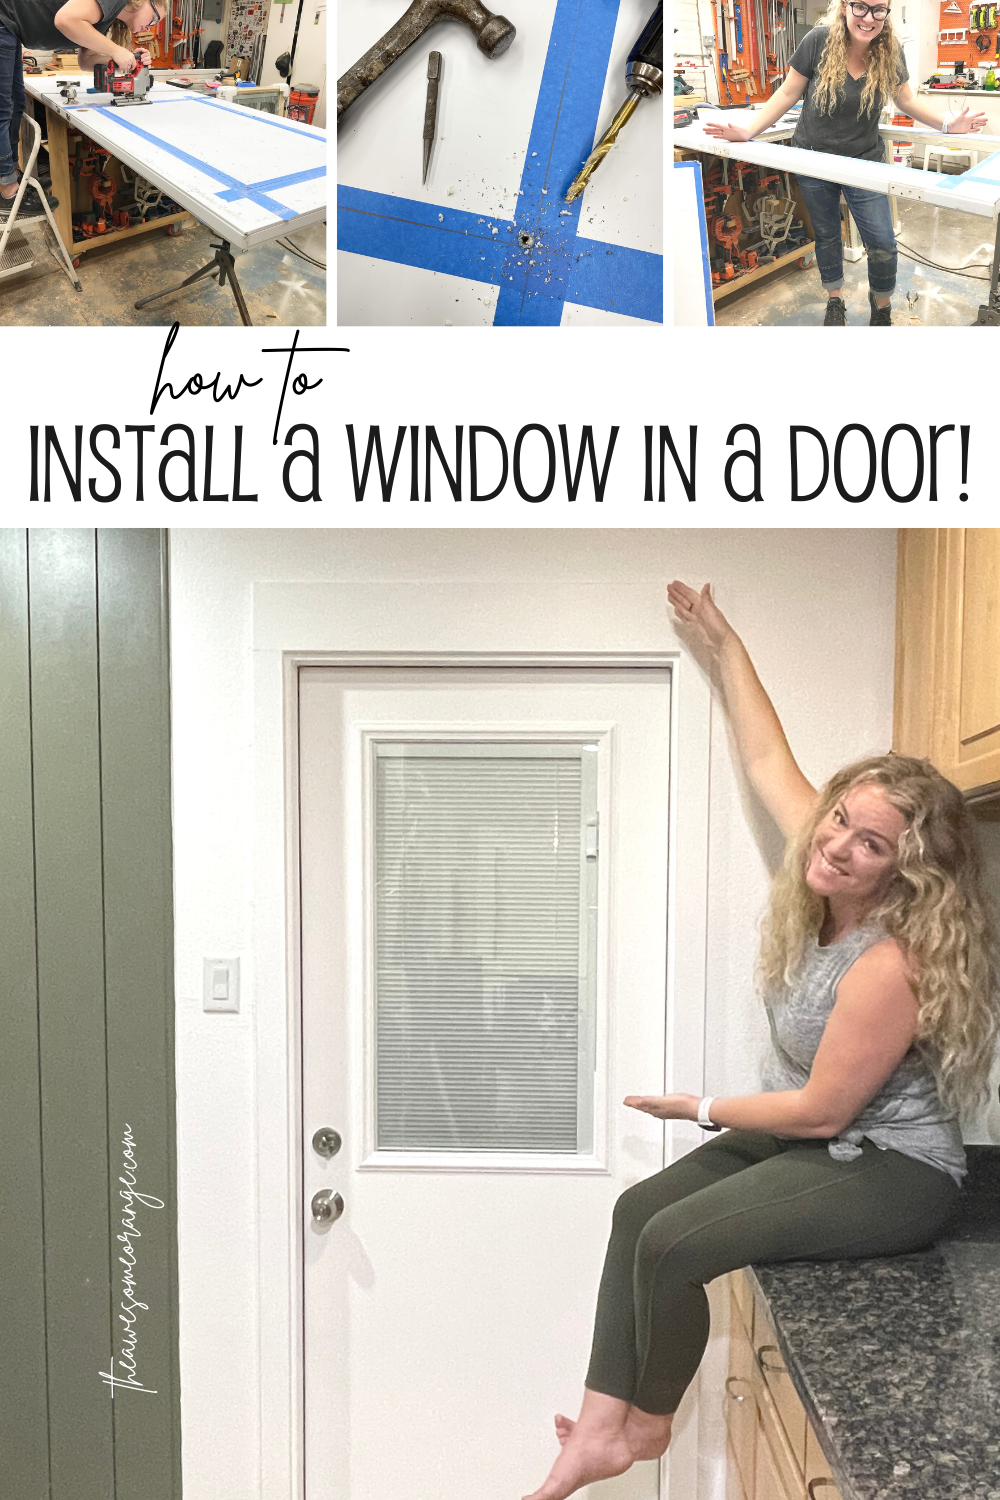
Remove door from hinges, remove handle set and set up on some sawhorses. I used my workbench and an outfeed stand.

At this point I still can’t believe I am going to cut a giant hole in my new door!
Step 2:
Layout out where you window is going to go. My window was 22” x 38”, but the opening for the window was 21” x 37”. Zabitat has a Measurement Guide on there website… you can find it here.
Step 3:
Apply painter’s tape on cut lines to help prevent damage to the door. You might have to redraw your layout lines so you can see them.

I had 5 1/4” on both sides of my door, so I made it 5 1/4” down for the top to make the three sides equal.
Step 4:
Drill 3/8” starter holes in the four corners of your layout lines. These will give you a starting point for the jigsaw to cut. NOTE: I like to use a nail set, so that my drill bit doesn’t slip when drilling the holes.

No turning back now!
Step 5:
Cut on lines with jigsaw. Make sure that jigsaw blade is short enough that is doesn’t go all the way thru the door!!! My door was 1 3/4” thick and my jigsaw blade went approximately 1 1/4” into the door. This will ensure you have a good cut line on both sides of the door. Also, make sure you are using a correct blade for your type of door. My door was metal, so I use a metal cutting blade.

Jigsaw blade needs to be shorter than the width of the door. Mine was about 1 1/4”.

Look ma… I’m doing it!
Step 6:
Flip the door over and repeat steps 2-5.
Step 7:
The fun part…. hammer out the square you just cut and remove tape!

Great success!!!!
Step 8:
Remove door from sawhorses and place window on a blanket (so it doesn’t get scratched) outside facing down. All you will need to remove the inside frame piece by taking out the screws.

The window came with great instructions!
Step 9:
Lay door on top glass and make sure that the bottom edge of door opening is snug to the bottom fo the door glass.

It fits!!!! Holy cow I did it. This was way smoother and easier than I thought.
Step 10:
Lay inside frame back on window lining of the screw holes.

Let’s put this thing back together! The frame is paintable or stainable.
Step 11:
Insert the provided screws in each screw hole working from side to side. Be sure to make the screws snug so the frame is tight against the door on both sides, but be cautious not to over tighten.

All hardware was provided with this window!
Step 12:
Install screw plus to hide the screw heads. Only do this once you are sure frame is secured to door on both sides.

So satisfying to see the screw heads disappear.
Step 13:
Re-install door on the hinges and pat yourself on the back for your new AWESOME door!

If you don’t have a helper, you can used block to jack up the door and hold it in place while attaching.
Wasn’t that easy?
Watch me install the window from start to finish on my YouTube Channel!
The window that I installed into my door has enclosed blinds and low-e double pane glass, but Zabitat has a ton of styles to fit your space and home decor. You can keep out all the options here.

I hope you enjoyed this tutorial! I can’t wait to get the rest of the laundry room complete. Be sure to follow me over on Instagram for all the behind the scenes work!

And remember Build LOUD, Build WILD and have an AWESOME day!
Sadie
Can’t do this project now? PIN it and Save for later!